Setting up PostgreSQL
For simplicity, this guide describes how to deploy PostgreSQL using OpenShift in the same cluster as the example. But first, it is important to understand how to insure the proper level of isolation for each microservice in production.
Ensuring the proper level of isolation
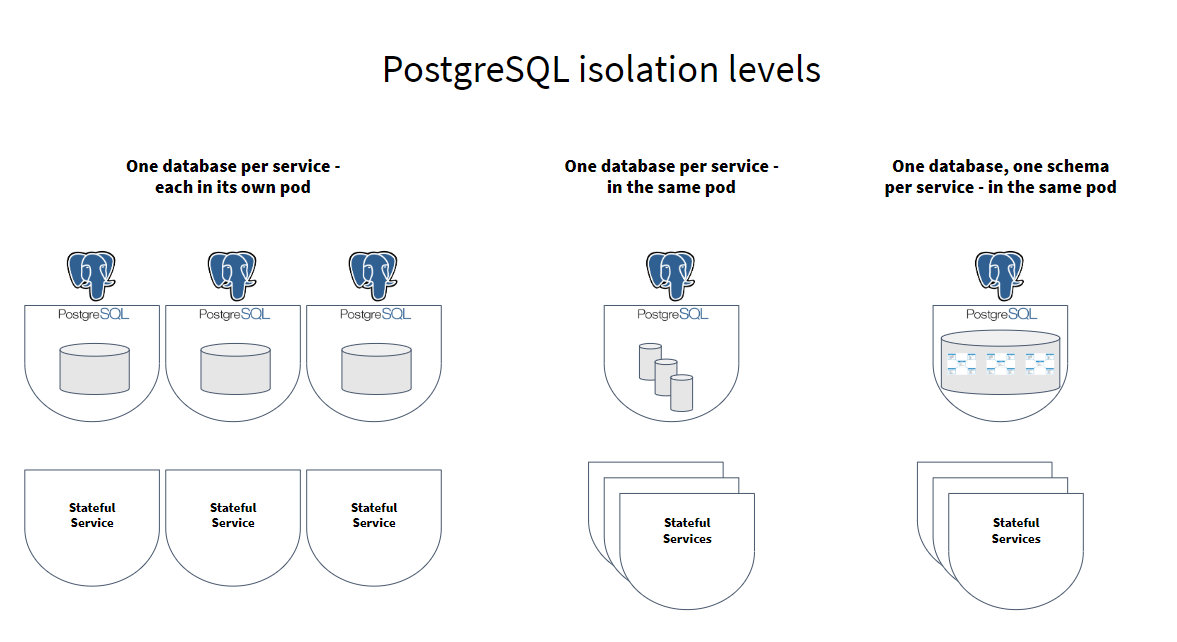
The first consideration when setting up a database should be determining how many database servers to run and how they will be distributed across pods. Microservices should have isolated data stores, that is, they should not share the same database tables. Ideally, this isolation should be enforced. As shown in the following illustration, PostgreSQL offers three different levels of isolation.
-
One database server per service—the highest level of isolation. A new PostgreSQLpod is deployed for each microservice that needs it. Each pod can be sized exactly according to its needs, and the pod shares no resources, CPU or memory, with PostgreSQL pods for other services.
-
One database per microservice on a single database server. Multiple databases, one for each service, are provisioned on a single PostgreSQL pod. Additionally, a user is created for each service, and this user is granted access only to the database for that service. This allows a moderate level of isolation, different databases can be configured to use different volume mounts and are reasonably portable between database services. However, because they share CPU and RAM, those using too many resources can negatively impact the others.
-
One database schema per microservice on a single database. In this setup, a single PostgreSQL pod is provisioned, with a single database, and multiple schemas are created in that database. Additionally, a user is created for each service, and this user is granted access only to the schema for that service. This allows the least level of isolation. Since all are on the same database, access-level rights provide the only isolation between the stores.
Choosing the most appropriate setup depends on your use case and organization. A combination of isolation levels might be appropriate. For example, sharing a single pod might be a good start to minimise resource usage. As load grows on the services, you might need to split out into multiple pods. And, a large organisation may decide to isolate by teams, so each team uses at least one pod. If teams manage multiple services, there might be many databases on each pod.
The Shopping Cart application only has one service that accesses the database, so any of these options would work. However, we’ll use a flexible setup, modeled on the second level of isolation, that makes it easy to add databases to the database pod as needed.
Database schema overview
Lagom will automatically create database tables if they do not exist. However, we do not recommended this in production, since it’s generally considered bad practice to allow an application database account to perform DDL statements. Instead, we’ll manually create the database schema.
The shopping cart application uses Akka persistence with the Akka persistence JDBC backend. This requires two tables: a journal table, which contains all entity events; and a snapshot table, which contains snapshots of the state every so many events. The schema for these tables on PostgreSQL can be found in the Akka persistence JDBC repository.
In addition, Lagom needs an offset table, which is used to track the progress of read side processors and Kafka publishers through the event log. This schema is part of the Shopping Cart project, in schemas/shopping-cart.sql. We’ll load the script using the psql client later.
Deploy PostgreSQL with OpenShift
OpenShift provides images for deploying PostgreSQL out of the box, which simplifies pod creation. Detailed documentation on using this image can be found here. Follow these steps to prepare the database:
1. Create a PostgreSQL pod
After you have connected to your OpenShift project, follow these steps to create the database pod:
-
Create an ephemeral database service called
postgresqlwith the following command:oc new-app -e POSTGRESQL_USER=PostgreSQL -e POSTGRESQL_PASSWORD=sdfasdfsad -e POSTGRESQL_DATABASE=shopping_cart postgresqlThis database is using ephemeral persistence, meaning that if the pod is restarted, all data will be lost. Refer to the PostgreSQL documentation for details on how to deploy persistent databases. You should see a messge that the service was created. We did not set an
adminpassword when creating the database because this would have hard coded it in the spec for the pod, making it readable to anyone that could read pods. Instead, we’re going to create a Kubernetes secret containing it, and then we’ll update the deployment to use that secret. -
Create the secret with a random password:
oc create secret generic postgresql-admin-password --from-literal=password="$(openssl rand -base64 24)" -
Patch the deployment config just created to use the admin password configured in the service.
oc patch deploymentconfig postgresql --patch '{"spec": {"template": {"spec": {"containers": [ {"name": "postgresql", "env": [ {"name": "POSTGRESQL_ADMIN_PASSWORD", "valueFrom": {"secretKeyRef": {"name": "postgresql-admin-password", "key": "password"}} } ]} ]}}}}' -
Use the following command to watch the database come up:
oc get pods -wDepending on how quickly the new pod comes up, you might see the old database terminate as the new deployment config is applied.
2. Provision the PostgreSQL database
We now need to create the database user, password, and the schema. To create our database, we’ll need to access PostgreSQL. There are two ways to do this:
-
Port forwarding, where you open a port on your local machine, and then use the
psqlclient installed on your local machine to connect to it. -
Shell into the PostgreSQL pod using
oc rsh, and use thepsqlclient installed on the pod to connect to the database.
We will use the first approach. It is simpler because the psql client on your local machine can access SQL scripts locally on your machine. To run a script when you shell into the pod, you would first need to copy the script there using oc rsync.
Follow these steps to provision the database:
-
Create the password, again using the secret API:
oc create secret generic postgres-shopping-cart --from-literal=username=shopping_cart --from-literal=password="$(openssl rand -base64 24)"On success, the prompt responds that the password has been created.
-
Retrieve the secret.
oc get secret postgres-shopping-cart -o jsonpath='{.data.password}' | base64 --decode -
Copy the decoded secret from the command window and save it for later use.
-
Start the port forward:
oc port-forward svc/postgresql 15432:5432 &This starts the forwarding in the background, it will output some logs when the tunnel is established, and each time it receives a new connection.
Now we can just run the
psqlcommand to connect as the PostgreSQLadminuser. The PostgreSQL image we’re using is configured to trust all connections fromlocalhost, and since the port forward command results in connections to it being made on the database aslocalhost, we can connect as any user without a password. We’ll directly feed it a script to create a database user, and grant that user access to just read/write operations on the database, so they won’t be able to execute any DDL statements. -
Connect to the
postgresdefault database:psql -h localhost -p 15432 -U postgresOn success, a
postgres=#prompt appears. -
Using the secret you saved previously, substitute it for
<secret>in the following command to create the user and password for theshopping_cartdatabase:CREATE USER shopping_cart WITH PASSWORD '<secret>';
-
Set the permission for this user and create the schema from the example script:
REVOKE CONNECT ON DATABASE shopping_cart FROM PUBLIC;
GRANT CONNECT ON DATABASE shopping_cart TO shopping_cart;

\connect shopping_cart;
REVOKE ALL ON SCHEMA public FROM PUBLIC;
GRANT USAGE ON SCHEMA public TO shopping_cart;
ALTER DEFAULT PRIVILEGES IN SCHEMA public
  GRANT SELECT, INSERT, UPDATE, DELETE ON TABLES TO shopping_cart;
ALTER DEFAULT PRIVILEGES IN SCHEMA public
  GRANT SELECT, USAGE ON SEQUENCES TO shopping_cart;

\include schemas/shopping-cart.sql;
The prompt changes to reflect that you are connected to the
shopping_cartdatabase. -
Type
\qto exit. -
Terminate the port forwarding session:
kill %1
What’s next
Next, follow the instructions for: Setting up Kafka.